Automation
Table of contents
To save on time and increase productivity, Checklist allows you to boost your “checklisting” with automations. Currently, we are supporting Checklist and Template automations. In addition, you can connect your Checklist account with your Zapier account.
We have almost completed the full Checklist Automation (with many triggers, actions, recipes and more) and will be releasing it in beta shortly. Contact us ↗ if you wish to try it out.
View Automations
Navigate to the Automation page by clicking on the Automation menu from the main menu:

The Automation page will open:
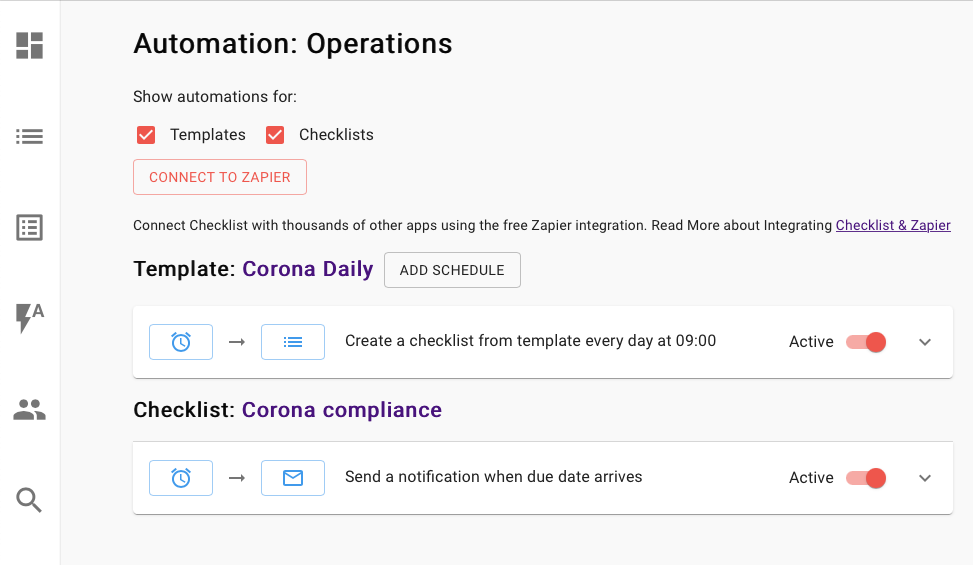
You will see:
- A filter of whether you want to view checklist automations, template automations (or you can keep both)
- Zapier connection
- Templates Automations
- Checklist Automations
Each checklist or template will include one or more automations belonging to it.
Checklist Automation
Currently, each checklist you create also gets a Due Date automation out of the box. This automation is triggered when the Due Date defined in the Due Date column (field) is reached and the task has not been completed yet. The task assignee (or if none, all checklist members) will then receive a notification email reminding them the task has not been completed. They can click on the link in the email to open the app and view the full checklist.
You can click on the automation to expand it:
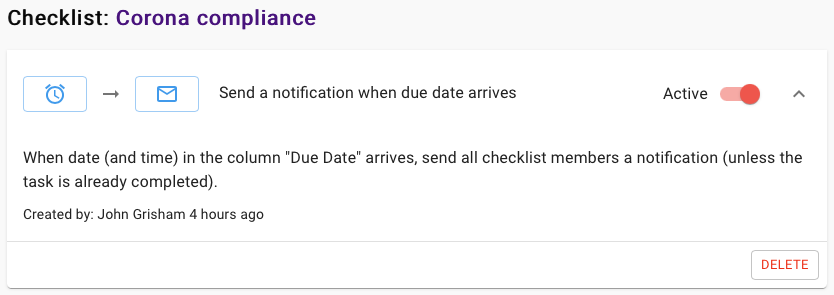
The following functionality is available:
- Active - you can toggle the automation on or off.
- Delete - This will remove the automation and no notifications will be sent for expired due dates
Template Automation
With Template Automations, you can set a regular schedule for the template to be “triggered” and a checklist created from it.
To add a schedule, click on the Automation button of the template (see Scheduling Templates). The Automation page will open with the name of the template at the top and an Add Schedule button. Clicking on it will open the Scheduling dialog:
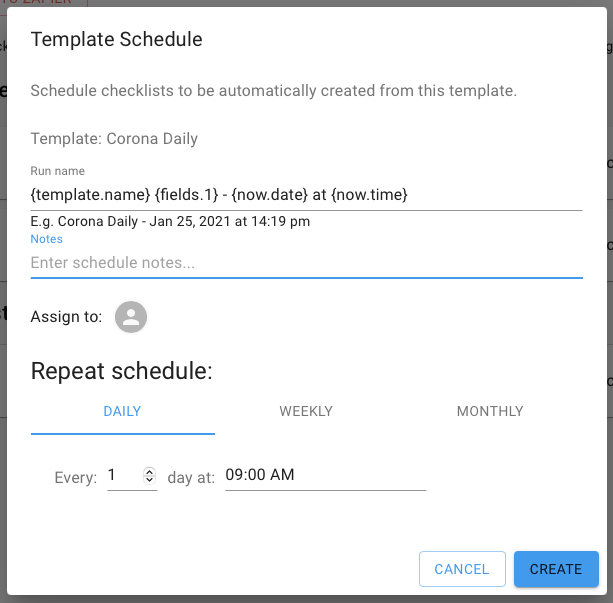
Once you have set the following, click on Create and the schedule will be set:
Trigger Name
You can set the name of the checklist created. You can use dynamic fields which are populated at trigger time:
- ${template.name} - the name of the template
- ${now.date} - current date
- ${now.time} - current time
- ${fields.1} - TBD
For example, if your template is named “Corona Daily” and the Trigger name is “{template.name} {fields.1} - {now.date} at {now.time}” then the system will replace when creating the checklist and the resulting name will be: “Corona Daily - Jan 25, 2021, at 14:19 pm”.
In most cases, you can simply leave this field as is.
Notes
You can set any notes to be set on the checklist notes.
Assign To
By default, the checklist created will be assigned to the team. You can also set a particular team member to have the checklist assigned to.
Repeat Schedule
You can choose (by clicking on one of the tabs) from
- Daily. Set daily recurrence and time
- Weekly. Set weekly recurrence, time and days of the week (you can choose more than one day)
- Monthly. Set monthly recurrence, time and on which day of the month (you can choose only one)
View/ Edit Template Schedule
Once a Template Schedule is created, you can view it:
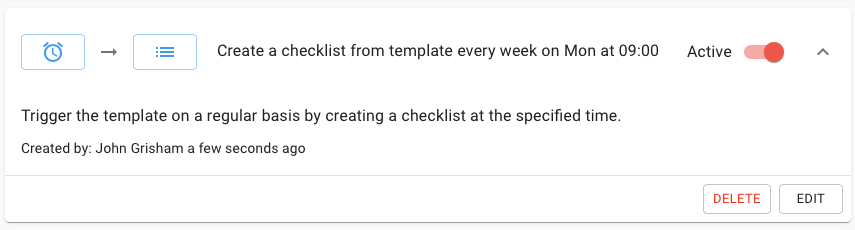
Note: you can have more than one automation per template.
You can click on the automation to expand it and view more options. The following are available:
- Active. Toggle to activate de-activate the automation
- Delete. This will completely remove the automation (this cannot be undone)
- Edit. Click to make a change to an existing automation
Zapier Integration
To connect your account with Zapier, you must first authenticate with Zapier. Click on the Connect To Zapier button to start the authentication. Once authenticated, you will be able to disconnect from Zapier by clicking on the Disconnect button (which will be shown instead of the Connect button).
Read more about Zapier integration ↗.